Bridging the gap between you and your audience.
📚 This post is part of my business blogging guide.
In this post, we’ll look at a couple of types of video that can add value to your blogs and make your message more relatable. We’ll also see the basic kit needed to create and share video.
Before you dive in, note that video creation takes time. I often spend 1 hour to produce 60 seconds of usable video. So, you might want to use this method only on your most important blog content.
There are 2 common types of video that work well in blog posts:
- Personal video: e.g. talking head, interviews, on-location filming.
- Screen video: e.g. software demos, PowerPoint slides, webinars.
- What are the benefits of using video in blog posts?
- How long should my videos be?
- How do I record personal video?
- How do I record screen video?
- Should I use a teleprompter?
- Which video platform should I use for my website videos?
- How do I embed videos in blog posts?
- How can I improve the watch time of my videos?
- Tips on how not to be a nervous scaredy cat on video
- Real examples of first-time videos
- When videos go wrong
- Let’s wrap up
What are the benefits of using video in blog posts?
Adding videos to your blog posts gives you:
- Better “dwell” time: this means people spend longer looking at your page. Google loves that because it indicates that the page has value.
- Better connection with audience: a few seconds of seeing someone move and talk on screen can beat all the words in the world.
- Appeal to different learner types: not everyone wants to read. Think about the visual learners of the YouTube generation.
How long should my videos be?
Keep it short, especially if you plan to share the content on social media. For example, each video in my LearnPlentyIn20 series is only 20 seconds long.
Recommended video lengths for social media.
| Platform | Ideal video length | Max video length |
|---|---|---|
| 30 seconds | 60 seconds | |
| 45 seconds | 140 seconds | |
| 60 seconds | 45 minutes | |
| 60 seconds | 10 minutes | |
| YouTube | 120 seconds | 12 hours |
The source for this table is HubSpot. As usual, LinkedIn was not included, so I’m basing the above on what others say and what I’ve seen from a little research into this.
My feeling is that shorter is always better for social media video, and LinkedIn is no exception.
The above data is about social media but videos on your website could be as long as you want. Your website = your rules.
Despite this, I wouldn’t create videos longer than 10 minutes unless you’re certain of their value to your audience. If you’re sharing a free training session or webinar, your videos might be much longer. In general, keep it tight.
How do I record personal video?
Equipment checklist.
- smartphone
- lapel mic
- tripod
- LED light (optional: any good lighting will do)
You can use your phone’s built-in camera app to record video. On iPhone, you could record using Clips or Clipomatic instead. These apps can automatically add captions to the video.
Recording on the go usually leads to shaky video. That’s OK for social media videos, but I wouldn’t put it on a business blog.
A tripod or other stabiliser is essential if you’re going to add good-quality smartphone video to your blog posts.
Once a video is saved in your camera roll, you can share it to YouTube via the YouTube mobile app. Other video platforms have their own mobile apps, or you could use your mobile web browser to upload the video.
Examples of good talking head videos.
Check out this video by my brand designer, Col Gray
Don’t be intimidated by the quality of this video! Col has been doing this for years and knows what works. For examples of first-time videos, check out the real examples below.
How do I record screen video?
Equipment check.
- screen capture software
- USB mic
- webcam (optional: useful if you want to be onscreen alongside your screen video)
This is the process I use to record my screen videos:
- Write the script: plan the steps for the video, and write the script that you’ll narrate.
- Gather the image assets: collect any accompanying images for the video.
- Prepare the screen: close unnecessary windows, move icons and documents as needed, change the desktop background if necessary, and generally get the “stage” ready.
- Record the video: use screen capture software to record the screen. Make your actions consistent with the script.
- Record the audio: use screen capture software to record the narrated script.
- Combine and edit: use screen capture software to make edits and add other effects.
- Export and publish: save the output and publish to the appropriate channels.
If you know your script well, you might be able to record the video and audio at the same time. I prefer to separate the tasks, which helps me focus better on each.
Screen capture software.
The most popular free option for screen recording is Loom, which integrates with Chrome.
At the click of a button in Chrome, you can record your screen and also your webcam – ideal for quick demos for clients.
I use Camtasia by TechSmith to record my screen on macOS. There’s also a Windows version.
Alternatives for macOS: ScreenFlow, QuickTime (free).
Alternative for macOS and Windows: HitFilm Express (free)
Microphone.
I record my audio using the RØDE Podcaster II USB.
Voiceover script.
Use any text editor to write out a script that you will narrate for the video. I record scripts a few lines at a time so I don’t have to redo large chunks if I make a mistake.
This method produces lots of audio files, but they’re easy to stick together in Camtasia.
Do your video and audio processing in Camtasia (or your video editor of choice). A how-to guide for doing all that is beyond the scope of this article, but there’s excellent help content on the TechSmith website.
Once you’ve created your final video file, share it to YouTube (or your preferred video platform) via your web browser.
When the video upload and processing is done, you can embed the video in a blog post or on another page of your website.
Here’s an example of one of my screen videos:
Should I use a teleprompter?
A teleprompter shows the words you’re going to say onscreen so that you don’t need to remember your lines.
These words aren’t shown in the final video (though they would be shown in a different way if you add captions to your videos, which you definitely ought to).
Whether or not you use a teleprompter, you should always have a basic script in mind. Rather than memorise this, it’s good to record your video in chunks and then stick the whole thing together.
If you want to try a teleprompter, check out these apps:
- For iOS: Video Teleprompter Lite
- For Android: Nano Teleprompter
Which video platform should I use for my website videos?
YouTube seems to be the best choice.
Google owns YouTube and there’s some suggestion that embedded YouTube videos on websites are likely to be better for your rankings than embedded videos from other platforms.
Some video-hosting options:
How to embed videos in blog posts.
All major video platforms provide the code you need to embed videos on your website or blog. Here are examples for YouTube and Vimeo.
How to get video embed code from YouTube.
- Beneath the video on YouTube, click Share.
- Click Embed.
- Copy the code in the Embed Video section.
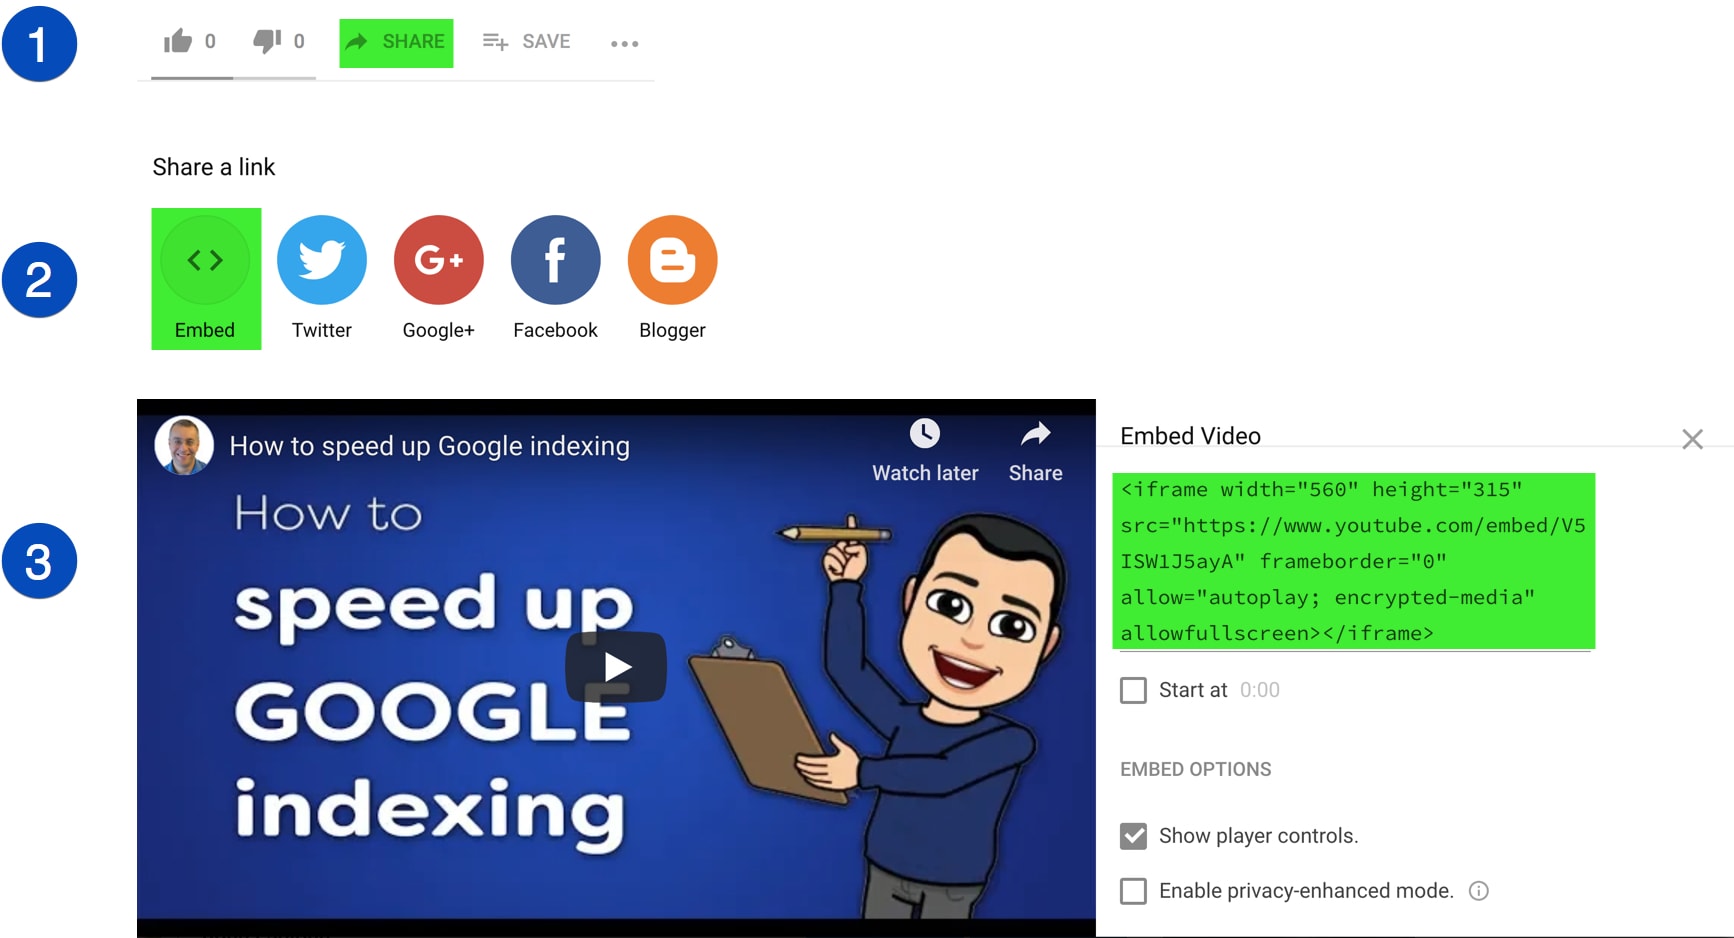
Once you’ve copied the embed code, edit your website or blog, paste in the code and then save the page.
(Update: Claire Brotherton says in the comments that if you tick the Enable privacy-enhanced mode box shown in the screenshot above, the embed code generated won’t set any YouTube cookies. Good idea.)
How to get video embed code from Vimeo.
- Beneath the video on Vimeo, click Share.
- Copy the code in the Embed section.
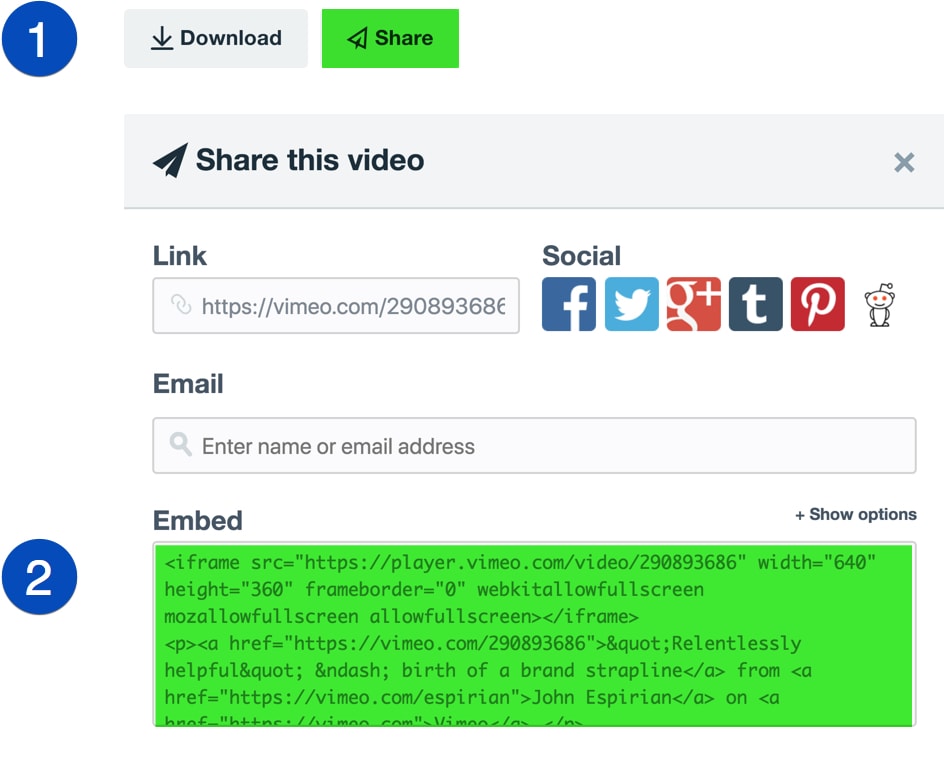
Again, edit your website or blog, paste in the code and then save the page.
If you use WordPress, you don’t need any embed code for YouTube and Vimeo videos. Instead, paste the direct link to the video when editing your website or blog and the video will display automatically when the page is view.
How can I improve the watch time of my videos?
Here are some tips to keep video viewers engaged:
- Demonstrate value in the first frame: make it clear what people will get from watching the video.
- Start quickly: make the intro short and then dive in.
- Keep it short: no one wants you to drone on. Can you crack it 90 seconds?
- Add captions: cater for people who can’t turn on sound or who are deaf or hard of hearing.
- Add visual items: use onscreen elements to keep people engaged.
- Change zoom/angles: add movement to go beyond a single static scene.
- Cut out gaps: remove all unnecessary pauses (in speech, progress screens, etc.) to keep the energy up.
- Use clear audio: people will tolerate poor video but won’t stand bad audio. Use a good mic and drown out the background noise.
Tips on how not to be a nervous scaredy cat on video.

Practise in private.
Create stuff and delete it in the comfort of your own private space.
Remember that it’s OK not to be perfect in your videos.

Speak at a visual prop placed near the lens.
Get a small photo or draw a figure, then put it near the lens and talk to it.
If you’re recording on your phone, don’t look at yourself. Keep your eyes focused near the lens.

Record in short bursts.
Use “jump cuts” to put the content together, so you don’t have to do long takes.
Short takes help with your breathing and mean that mistakes don’t ruin your results.

Smile and pretend to be more confident than you are.
Andrew and Pete always say to be more energetic on camera than you feel.
The result comes across as warm and friendly when the final video is done.

Get a video buddy.
Partner with a friend or colleague who also wants to create video for their business.
Stay accountable to each other!
Real examples of first-time videos.
All of these people have posted first-time videos on LinkedIn, and have given me permission to share them as examples to help inspire others.
Whether you post on social or on your website or blog, don’t be afraid to get started. Follow the tips on how not to be a nervous scaredy cat on video above and see how you go.
When videos go wrong.
Not everything goes perfectly with video, and I’ve learned that we should always measure twice, cut once.
I’d bought a green screen to wrap around my office chair and assumed naively that it wouldn’t be hard to remove the green background in post-production (one of the features of Camtasia, my preferred video editor).
Turns out that it was harder than I expected, but only because of the poor quality of the screen and my lighting setup.
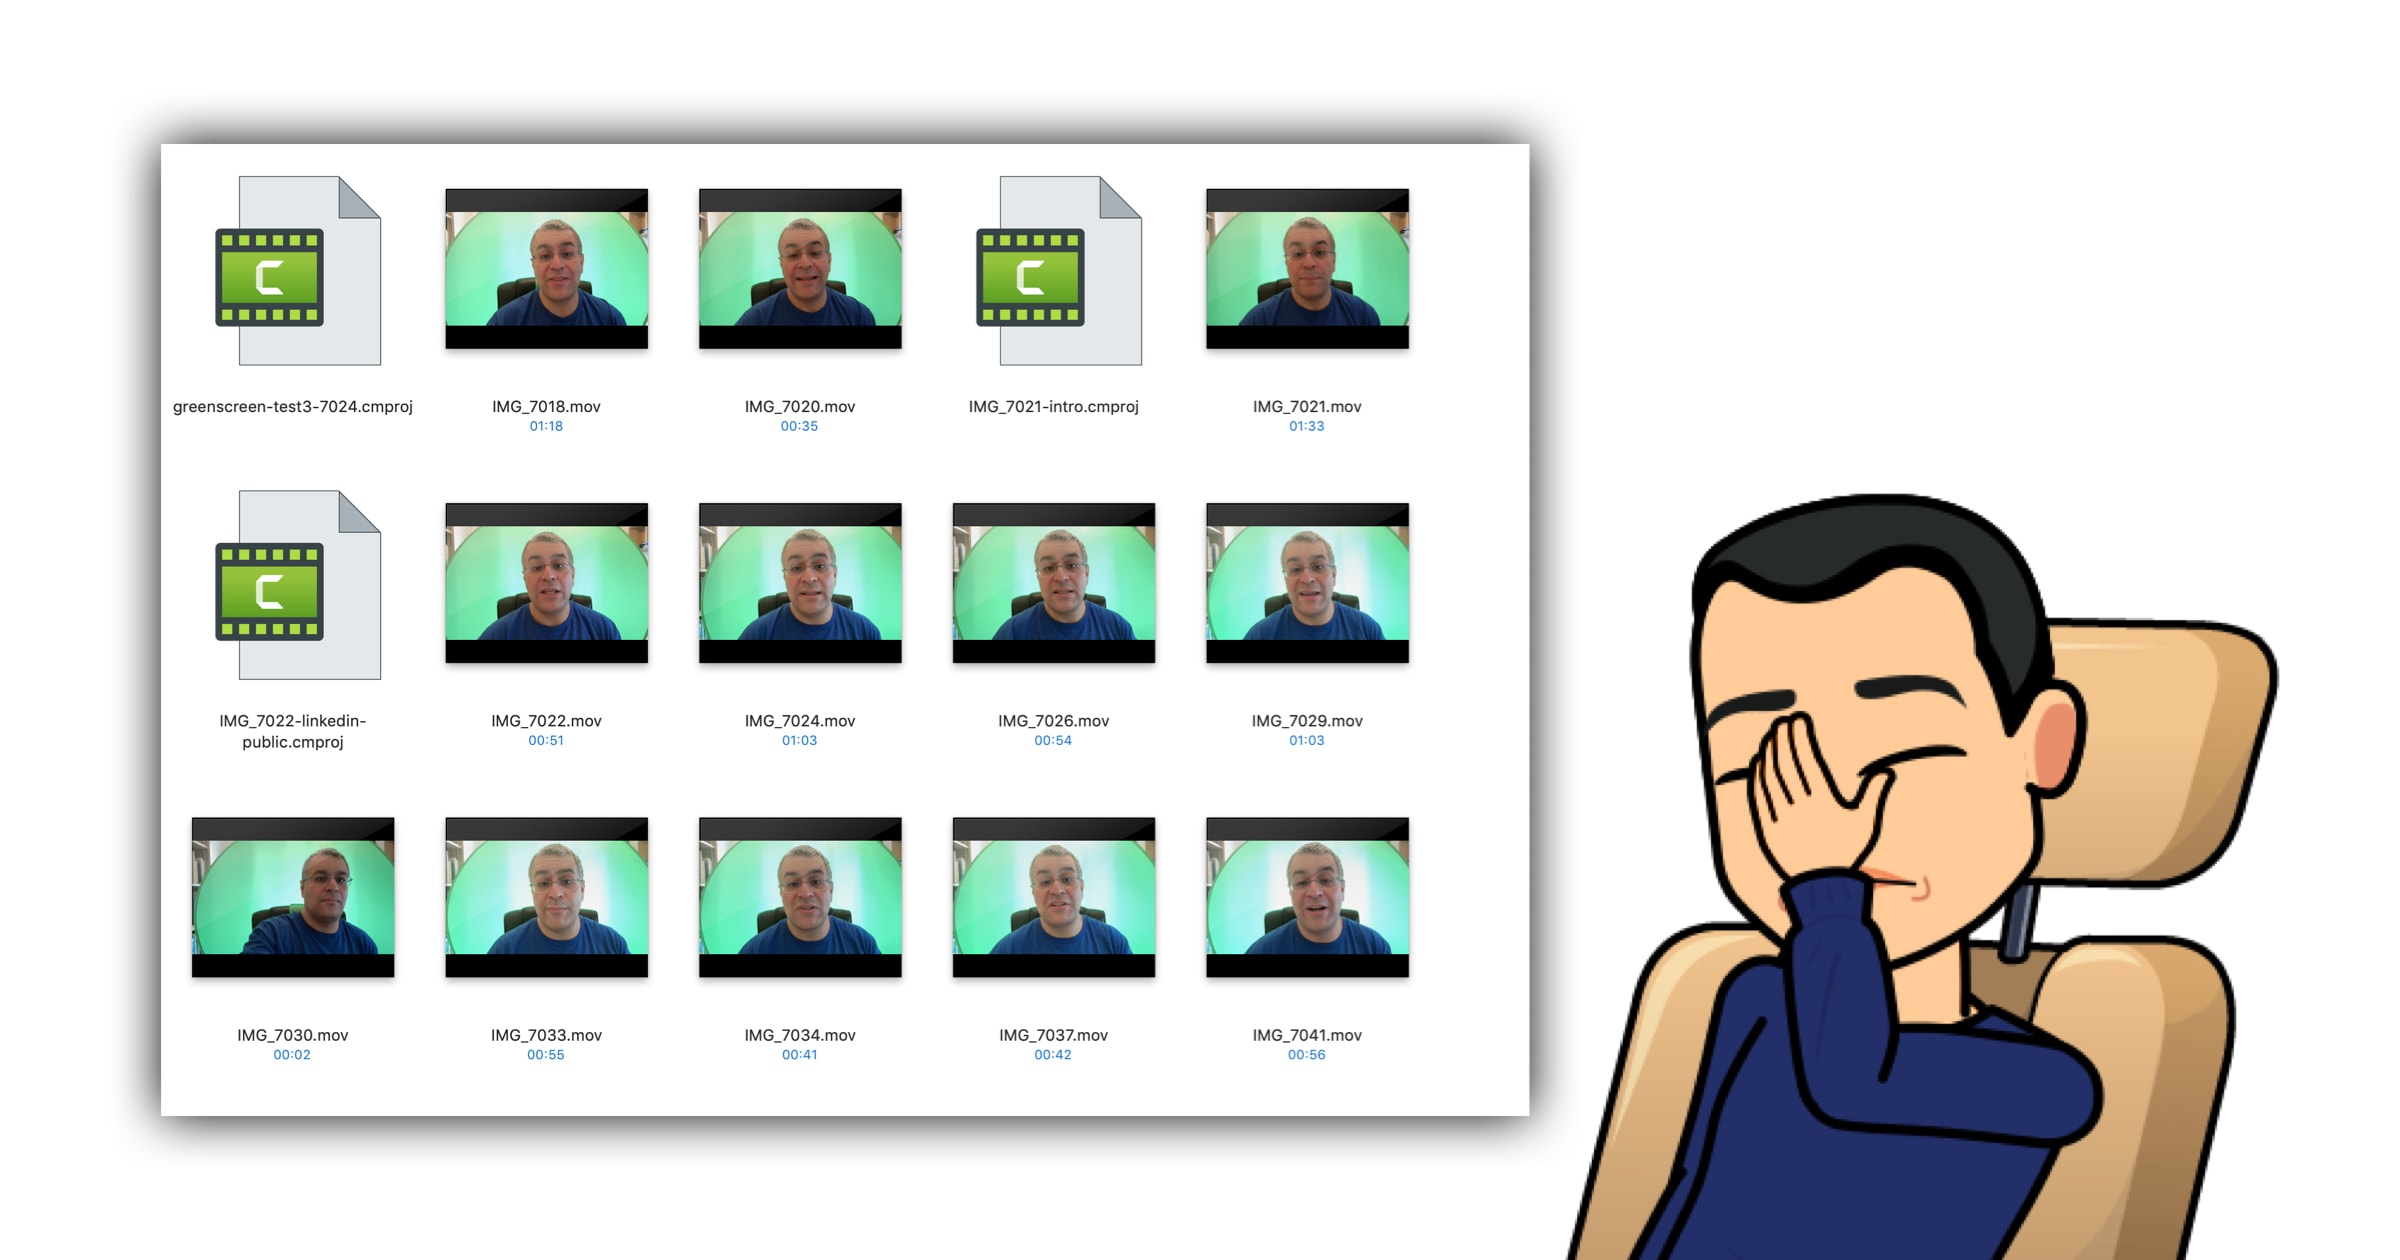
I was going to dump all of the following videos (which I’m going to re-record for my new website), but I’ve decided to keep them here for posterity.
- About page: 48 seconds
- Website writing: 58 seconds
- Blog writing: 47 seconds
- Case studies: 57 seconds
- Copy Fix: 47 seconds
- LinkedIn profile: 22 seconds
- LinkedIn 1-to-1: 32 seconds
- Espresso thanks: 37 seconds
I posted about this shambles on LinkedIn, and one person took that as a personal challenge to see whether the videos could indeed be fixed:
Posted by my LinkedIn connection Avraham Kohn
I’m glad Avraham decided to plonk me in Paris. Imagine if he’d put me in Old Trafford instead. I’d have been sick.
Anyway, I’ve decided to dump the green screen for my videos. It was never necessary.
PS. If you want to check out the tools I use to do my technical copywriting work and social videos, look at my Tools for the job page.
Let’s wrap up.
Adding videos to your written blog posts will give them an extra dimension and can improve the amount of time your audience spends on each page. This signals to Google that there’s something of value on your site, and that in turn can increase the chances of your content ranking well and reaching more people.
Whether it’s a talking-head or a recording of your screen, think about how video can bridge the gap between you and your audience. Do it well and you’ll be more memorable and trustworthy – and that’s good if you want to do more business.
Continue the business blogging guide
This post is part of my definitive business blogging guide.
Previous step
Know your image sizesNext step
Add captions to your videos